How to Flash stock ROM on Google Nexus Devices

Flash Stock ROM on Google Nexus
Flash Stock ROM on Google Nexus Devices:
Having problems flashing stock ROM or don’t know how to do it on nexus devices? Now, here is a dedicated post for flashing Stock ROM on google nexus devices. We all know that the nexus devices are manufactured by the original Android OS developer, that’s Google.
Please go through the following steps one by one sequentially.
Pre-requisites:
- It is always better to have the data back-up when we are dealing with the firmware and flashing things.
- Charge up your phone to at least 50-60 %, since the flashing takes some time and to be on the safer side.
Step 1:
Download and Install the Google Nexus drivers from the PC from which you are doing the Flashing from.

Step 2:
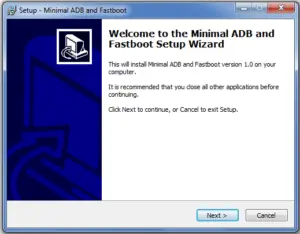
Flashing Nexus devices also requires Minimal ADB and flash tool on the computer. Download and install the same on the computer from the same PC.
Step 3:
Download The Stock Rom for Google Nexus
- Any flashing process of ROM always requires Stock ROM downloaded on it. Stock ROM is always specific for the devices. Download the specific stock ROM for your device.
- Download some Zip extracting software file. I recommend this tool for it. Extract the downloaded firmware.
Step 4:
- Go to Settings ->Developer options ->USB debugging. Check the mark to enable.
- Step by step guide to Enable USB debugging/ developer option
- You also need to have the developer option enabled. But, by default it is disabled for android 4.2.2 and above. So, follow the below mentioned steps to enable developer options.
Once you find the built number, click on it for 5-9 times.
Step 5:
Power off the Google Nexus device.

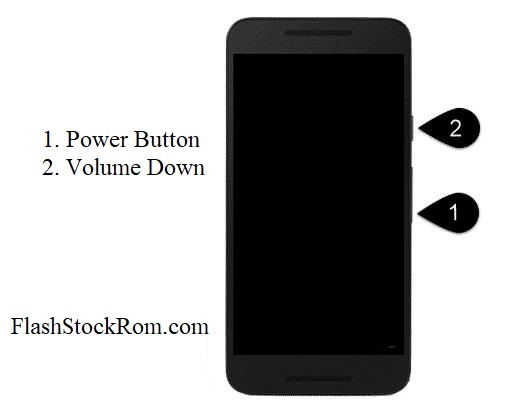
Step 6:
Switch the device into fastboot mode. To do so, Press and hold Power + Volume down buttons simultaneously for 5-10 seconds until the devices witches to fastboot mode.
Step 7:
Connect the device to the Computer from USB driver.
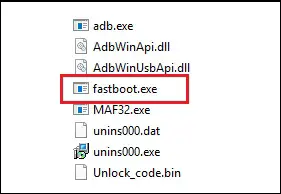
Step 8:
When you have performed the step 4, you would have got the extracted files there as shown below. Search for MAF.exe from minimal ADB or fastboot folder. The path for the same would be C: Program files/minimal ADB/fastboot.
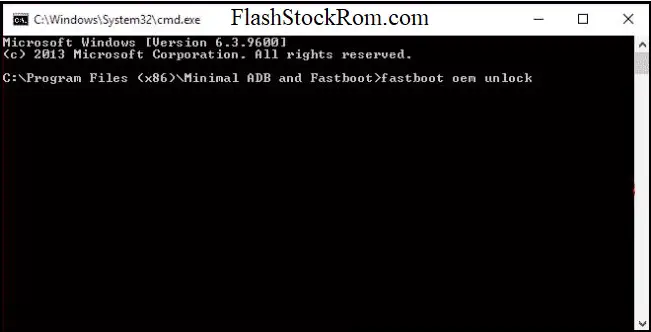
Step 9:
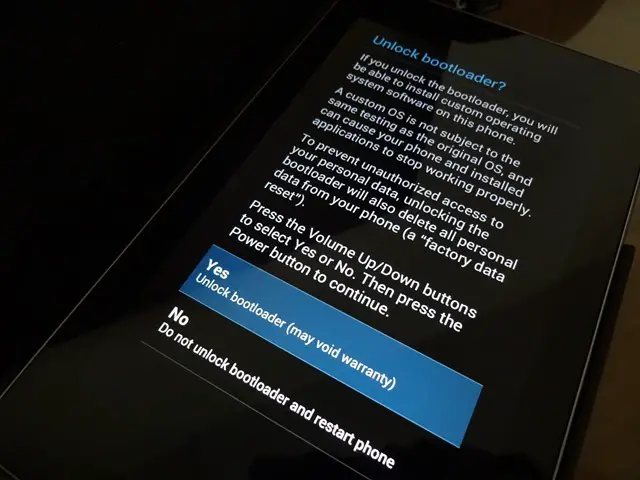
The command prompt window pops up when the exe file is clicked. Once the command prompt pops up, type fastboot oem unlock in it.
Step 10:
The above command pressed will unlock the bootloader. Hence, the device will throw a warning message saying the same. Use the volume buttons to browse through and select the Yes option to continue.
Step 11:
Flashing Stock Rom on Google Nexus
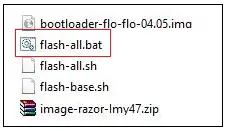
Once you click on yes, the boot loader would get unlocked. The next step would be to flash the device. Open the extracted files and browse through the same to search the option flash-all.bat
Step 12:
The flashing process will start and will hardly take 10-15 minutes to complete the process.
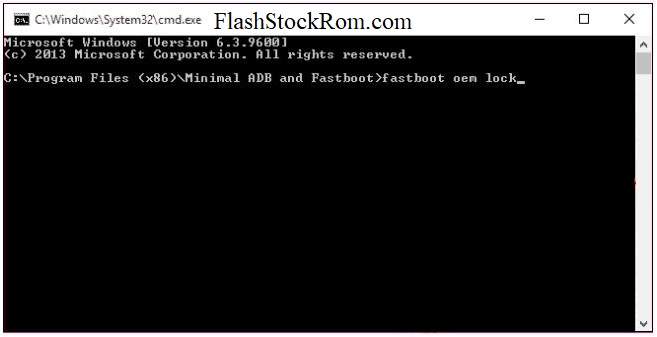
Step 13:
once this is done, you should lock back the bootloader, to do so, open the file py_cmd.exe from Minimal fastboot and ADB folder and type fastboot oem lock
Frequently Asked Questions Listed Below
cannot load system.img error in cmd prompt
- Make sure you run CMD as admin
- Make sure you close all other applications before sending system.img
FAILED <remote: Unknown chunk type>
- download the images again.
- If you still get the error then try different cables / ports etc.
- error persist? then use the LG flash tool method
I can’t Flash Stock Rom on Google Nexus .
Do it again with fresh Files. Your problem is persist then Leave a Comment With Full details about error. Then our team will help you. or try this
unknown partition ‘recovery.img’
Don’t wary it is wrong syntax, So, it must be: fastboot flash recovery recovery.img
Google Nexus doesn’t turn on, or respond to power button ( Dead/Soft Brick).
- After that Give up to 15mins for first boot.
- Find Another Rom from alternative source.
- Use different USB port and download all files again
Google Nexus Doesn’t not pass boot logo/bootloop
After Flashing, Google Nexus phone doesn’t pass the boot logo that mean,there is something wrong with your Google Nexus . However let it to start 15mins at least because this is first boot. After that if any Problem persists then Try to hard reset and do the Flash again.
Google Nexus stuck at boot/ continuously restarts/ keep rebooting
first time it may give this kind of things. wait and watch. first boot may be slow. if Problem persists then Try to hard reset and do the Flashing Stock firmware on Google Nexus again with fresh Files.
Phone automatically disconnecting during flashing
- Try changing the USB-port
- Make sure you have the correct drivers installed
- Try another PC and USB cable.
USB device not recognized
This is not related to Flashing. seems like this is error of your USB port for the reason that you get this error. fix it from here
Congratulations on flashing your Google Nexus devices. If you are still facing any issues or stuck with any steps with confusion, please drop the queries in the comment section. One of our team members will get back to solve the issue quickly. Please go through other posts if you are interested. If you have liked the post, please refer the same for your friends. Thank you!