How to Flash Samsung Stock Firmwares Using Odin Tool
There are many reasons for flash your mobile phones. Boot loop issue, massive lags, soft bricks are some of them. If you want to Flash Your mobile phone because of any of those reasons and you are finding a perfect guild for it So you are at the right place. Here we provide you to the instructions for the flash Samsung Stock firmware from
downloading to installing it using Odin tool in windows PC.
Installing Stock Rom will unroot your device and fix above problems and you can use your device having no problems. Samsung ROM is available for many regions and you have to download the correct firmware when you are Flashing.
Benifits of flashing stock roms
- You can fix bootloop issues and stuck in Samsung logo during reboot.
- You can downgrade/upgrade your phone to different android versions.
- You can completely unroot your device.
- You can reset your device back to the factory state.
- You can remove custom recovery like TWRP and CWM in your device.
Check these things before the flashing process
- Your phone should have at least 50%-60% of battery health otherwise don’t do the flashing process.
- Flashing your device will erase things in your device(apps,data) so take a back up before Flash.
- Unable USB debugging and OEM unlock on your device.(To do this go to the Settings>Developer options) for more details here the guideline.
Guidelines for the flashing process
Step 1: Download the Samsung USB drivers for your computer. If you already downloaded it skip this step.
Step 2: Download the firmware that compatible to your device and extract it on your computer. If you have already downloaded it skip this step.
Step 3: Power off your device.
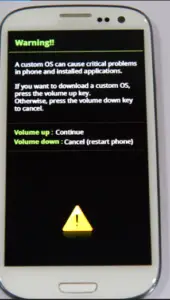
Step 4: Now you have to boot your device into the download mode.(To do this press and hold volume down,home and power keys when phone vibrates release the power key but keep press and hold other two keys.)
Step 5: When you come to the download mode you can see the warning message. Now press volume up
key to keep continue the flashing process.
Step 6: Then download the Odin tool and extract it on your computer.
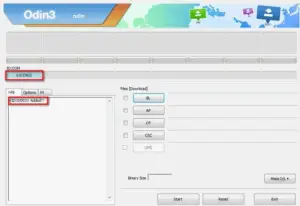
Step 7: Then connect your phone to the PC using USB cable. When you connect it Odin will automatically recognize your device and show “Added” message.( If not that means your driver is not correctly installed or try with different USB cable.)
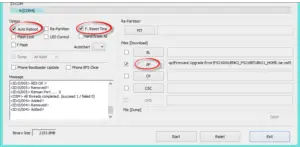
Step8 : After device is recognized by Odin click button and the check box in-front of it for select the extracted .tar.md5 firmware file. ( If your zip file having only one extracted file it is “AP” and otherwise select other buttons and locate other firmware files also. You can find what is the correct button using the file name of extracted files.
- BL: BL_file name.tar.md5
- AP: AP_file name.tar.md5
- CP: CP_file name.tar.md5
- CSC: CSC_file name.tar.md5 )
Step 9: Now click the start button to start the flashing process.
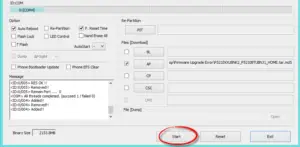
Step 10: When you see the “Pass” message with green color remove the USB cable from device.

Step 11: Now you have to press and hold volume up ,home and power keys to take your phone to the stock recovery mode. When phone vibrates leave the power key but keep press and hold other two keys.
Step 12: In the recovery mode select “Wipe data factory reset”.

Step 13: Now select “Reboot system now”.

Step 14: Now your device will be reboot and flashed successfully……………