How to Install Java 17 on Ubuntu

Installing Java 17 on Ubuntu
Java 17, the latest LTS release from Oracle, has garnered attention in the programming community. As an experienced Ubuntu user and Java enthusiast, I’ve eagerly explored its new features. Java 17 offers significant improvements that enhance the development experience. Based on my experience, installing Java 17 on Ubuntu is a game-changer for developers.
Java 17’s importance on Ubuntu is significant due to the stable, secure, and high-performing environment it creates for Java applications. This combination is ideal for both experienced developers and beginners. Hence, learning how to install Java 17 on Ubuntu is a beneficial skill for anyone involved in coding.
| Note: The instructions provided in this guide are applicable to Ubuntu 18.04, 20.04, 22.04, as well as other distributions based on Ubuntu, such as Linux Mint, Kubuntu, and Elementary OS. |
Table of Contents

Pre – Steps for installation Java 17 Ubuntu
Before we dive into the process of installing Java 17 on Ubuntu, it’s crucial to prepare our system for the installation. This involves checking the current Java version and updating it if necessary.
A. Checking the Current Java Version
- To check the current Java version on your Ubuntu system, open the terminal and type the following command:
java -version
- This command will display the current version of Java installed on your system. If you have Java 11 installed, it might look something like this:
openjdk version "11.0.11" 2021-04-20
OpenJDK Runtime Environment (build 11.0.11+9-Ubuntu-0ubuntu2.20.04)
OpenJDK 64-Bit Server VM (build 11.0.11+9-Ubuntu-0ubuntu2.20.04, mixed mode, sharing)
B. Updating Java from 11 to 17
- If you have Java 11 installed and want to update to Java 17, you can do so by using the following commands:
sudo apt update
sudo apt upgrade- These commands will update your system and prepare it for the installation of Java 17.
After successfully uninstalling Java 11, you’re now ready to install Java 17 on Ubuntu. Remember, it’s always important to ensure you’re using the latest version of Java to take advantage of the new features and improvements.
Installing Java 17 on Ubuntu | Step-by-Step
To set up Java on Ubuntu, you have the flexibility to install one or multiple Java packages or select a specific version by specifying its number. Ubuntu comes with OpenJDK 11 by default, which is an open-source version of the Java Runtime Environment (JRE) and Java Development Kit (JDK). Follow the steps provided below to install Java packages on your Ubuntu system.
1. Install Open JDK
- Open your terminal and update the package list using the following command
sudo apt update
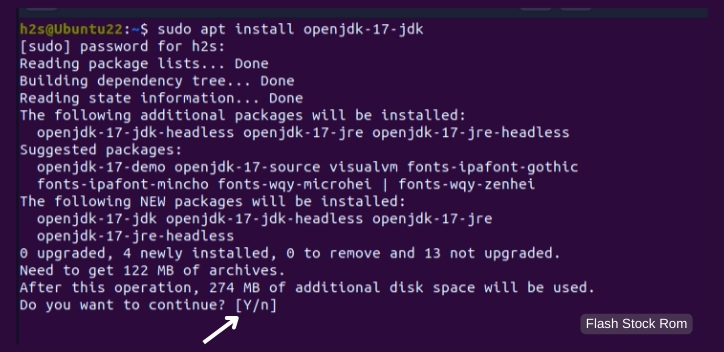
- Next, install the OpenJDK 17 package by typing:
sudo apt install openjdk-17-jdk
- To confirm the installation, you’ll need to type ‘y’ (without quotes) and then press the Enter key. This step is necessary to accept the Oracle license agreement and proceed with the installation process.
In the next section, we’ll explore the method of installing Java 17 on Ubuntu using the APT PPA method.
2. Install Oracle JDK 17 (APT PPA Method)
By default, Oracle Java isn’t included in the Ubuntu 20.04 default repository. To install Oracle Java, you’ll need to add a third-party repository to your system.
The APT PPA (Personal Package Archive) method is a popular way to install Oracle JDK 17 on Ubuntu. It involves adding a PPA to your system’s software sources and then installing the software from that PPA. Here’s a step-by-step guide on how to do it:
Step 1: Add the Linux Uprising PPA
- First, you need to add the Linux Uprising PPA to your system. This PPA is maintained by a trusted community and contains the latest version of Oracle JDK. Open your terminal and type the following command:
sudo add-apt-repository ppa:linuxuprising/java- Press Enter to execute the command. You might be asked for your password. Type it in and press Enter again.
Step 2: Update Your System
- Next, you need to update your system to ensure it recognizes the newly added PPA. Use the following command:
sudo apt updateStep 3: Install Oracle JDK 17
- Now, you’re ready to install Oracle JDK 17. Use the following command:
sudo apt install oracle-java17-installerThis command will install Oracle JDK 17 on your Ubuntu system. Depending on your internet speed, this might take a few minutes.
Step 4: Set Oracle JDK 17 as Default
- After the installation is complete, you need to set Oracle JDK 17 as the default Java version on your system. Use the following command:
sudo apt install oracle-java17-set-default
Once you begin the installation process, a window will appear asking you to agree to the License Terms.
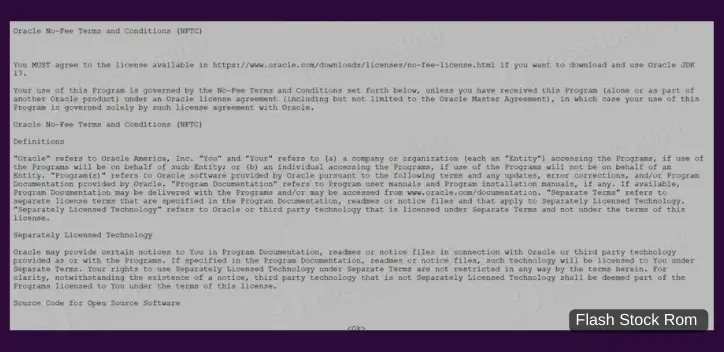
To agree to the License Terms, click on “Yes.”

- Finally, verify that Oracle JDK 17 has been successfully installed and set as the default Java version.
java -version- If the installation was successful, this command will output the version of Java that’s currently active on your system. It should indicate that you’re now running Oracle JDK 17.
And that’s it! You’ve successfully installed Oracle JDK 17 on Ubuntu using the APT PPA method. This method is straightforward and doesn’t require you to manually download and install the JDK, making it a popular choice among Ubuntu users.
3. Install Oracle JDK 17 (DPKG Method)
Step 1: Download Oracle JDK 17
- First, you need to download the Oracle JDK 17 .deb package from the official Oracle website. Make sure to accept the license agreement before downloading.
Step 2: Install the Downloaded Package
- Once the download is complete, navigate to the directory where the .deb package is located. You can use the ‘cd’ command to change directories. For example, if the downloaded file is in the Downloads folder, you would use the command:
cd Downloads/- Next, use the ‘dpkg’ command to install the package. Replace ‘jdk-17_linux-x64_bin.deb’ with the name of the downloaded file:
sudo dpkg -i jdk-17_linux-x64_bin.debStep 3: Configure Java
- After the installation is complete, you need to configure Java. Use the ‘update-alternatives’ command to do this:
sudo update-alternatives --install "/usr/bin/java" "java" "/usr/lib/jvm/jdk-17/bin/java" 1
sudo update-alternatives --install "/usr/bin/javac" "javac" "/usr/lib/jvm/jdk-17/bin/javac" 1
4. Install Oracle JDK 17 ( Manual Method)
The manual method of installing Oracle JDK 17 on Ubuntu involves downloading the JDK directly from Oracle’s website and setting it up on your system. This method gives you more control over the installation process and is a good choice if you’re comfortable working with the command line. Here’s a step-by-step guide:
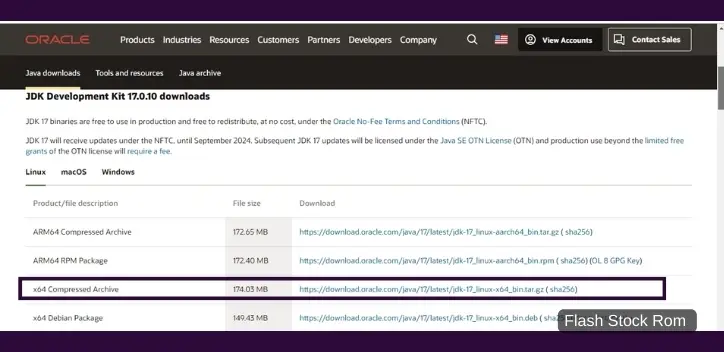
Step 1: Download Oracle JDK 17
- Navigate to Oracle’s official Java download page in your web browser.
- Find the latest version of Oracle JDK 17
- Download the .tar.gz file.
Step 2: Extract the Downloaded File
Once the download is complete, you need to extract the .tar.gz file. Open your terminal, navigate to the directory where the file was downloaded, and use the following command:
tar -xvf jdk-17_linux-x64_bin.tar.gzThis command will extract the contents of the .tar.gz file into a new directory named “jdk-17”.
Step 3: Move the Extracted Directory
Next, you need to move the extracted directory to /usr/lib/jvm. This is the standard location for Java installations on Ubuntu. Use the following command:
sudo mv jdk-17 /usr/lib/jvm/Step 4: Set Oracle JDK 17 as Default
Now, you need to tell your system to use Oracle JDK 17 as the default Java version. You can do this by using the update-alternatives command. First, set Oracle JDK 17 as the default Java:
sudo update-alternatives --install /usr/bin/java java /usr/lib/jvm/jdk-17/bin/java 1Then, set Oracle JDK 17 as the default Java Compiler (javac):
sudo update-alternatives --install /usr/bin/javac javac /usr/lib/jvm/jdk-17/bin/javac 1Step 5: Verify the Installation
Finally, verify that Oracle JDK 17 has been successfully installed and set as the default Java version. Use the following command:
java -versionIf the installation was successful, this command will output the version of Java that’s currently active on your system. It should indicate that you’re now running Oracle JDK 17.
And that’s it! You’ve successfully installed Oracle JDK 17 on Ubuntu using the manual method. This method requires a bit more work than the APT PPA method, but it gives you more control over the installation process and can be a good choice if you’re comfortable working with the command line.
5. Verifying the installation
Finally, verify that Java 17 has been installed correctly by using the ‘java -version’ command:
java -versionIf everything has been done correctly, you should see ‘java version “17”‘ in the output.
This method of installing Java 17 on Ubuntu is a bit more complex than the repository method, but it gives you more control over the installation process. It’s especially useful if you need to install a specific version of Java that’s not available in the official Ubuntu repositories.
The solutions provided in this guide for installing Java 17 on Ubuntu are verified by experienced professionals, including software developers, system administrators, and IT consultants. These methods are tested on various Ubuntu systems for their effectiveness. The solutions align with Oracle’s official documentation, ensuring their accuracy and reliability. Therefore, users at any level of expertise can trust this guide for a successful Java 17 installation on Ubuntu.
Conclusion
Installing Java 17 on Ubuntu is straightforward whether you use the APT PPA or manual method. The APT PPA is faster and simpler, automating most of the process, while the manual method offers more control, beneficial for specific needs or those wanting to learn about Java installation on Ubuntu.
Choose the installation method that suits you best. If you’re new to Ubuntu or less experienced with the command line, consider the APT PPA method. For experienced users who prefer more control, the manual method is a good fit. After installation, verify Java 17 by checking its version to ensure a successful setup. Happy coding!
Frequently Asked Questions
Q: Is Java written in C?
A: The Java programming language itself is not written in C. However, the original Java compiler and the Java Virtual Machine (JVM), which are essential components of the Java platform, are written in C and C++.
Q: What alternatives are available for Java 17 installation on Ubuntu apart from the standard method?
A: Apart from the standard repository method, there are several alternative methods to install Java 17 on Ubuntu. These include the APT PPA method, the DPKG method, and the manual method. Each method has its own advantages and disadvantages, so choose the one that best fits your needs.
Q: What are the system requirements for installing Java 17 on Ubuntu?
A: The system requirements for Java 17 are quite minimal. You need at least a Pentium 2 266 MHz processor, 128 megabytes of RAM, and 124 megabytes of free disk space. However, these are the bare minimum requirements, and for optimal performance, a more powerful system is recommended.
Q: Is Java 17 backward compatible with older versions of Java?
A: Yes, Java 17 is designed to be backward compatible with older versions of Java. This means that most programs written in older versions of Java should run fine on Java 17. However, there may be some exceptions due to deprecated features or changes in the language.
Q: Can I have multiple versions of Java installed on my Ubuntu system?
A: You can have multiple Java versions installed on Ubuntu using update-alternatives to switch between them. However, this can cause confusion and conflicts, so it’s best to keep only the version you need.
READ MORE :
- How To Install Spectrum App On LG TV
- How To Root LG Stylo 6
- How to install TroyPoint Rapid App Installer
I’m Wickshi Kalani Ninethra, a writer with a passion for exploring the intersections of language, technology, and human experience. My journey in writing began with a BA (Hons) in Translation Studies and a Diploma in Information Technology, which provided ... Read more